

Zoom update
We will not be renewing Zoom licences for staff and students from June 2024.
Frequently asked questions
Will I still be able to access a Zoom call or webinar that someone outside the RCS has set up?
Yes – just follow the links on the invitation you have been sent.
Will I be able to set up a call or webinar for people outside the RCS to access through Teams?
Yes – just add their email address to the ‘required’ field when setting up the meeting in Outlook or Teams, or send them the invitation link if it is a webinar. Here is further information on Teams webinars: Get started with Microsoft Teams webinars – Microsoft Support
Can I buy a licence for my team/department?
No – all IT support for Zoom is ending.
How do I turn on live captioning in Teams?
Microsoft provides guidance on to turn live captioning on and off for both desktop and mobile versions of Teams: Use live captions in Microsoft Teams meetings – Microsoft Support
How do I pin a Sign Language Interpreter to a fixed place on the screen?
Microsoft guidance on how to use Sign Language View is provided here: Use Sign Language View in Microsoft Teams – Microsoft Support
How well does Teams work for sharing music online?
Teams has improved its functionality around music sharing, with a specific music mode that can be found in the audio settings. You can find further information here: Use high fidelity music mode to play music in Microsoft Teams – Microsoft Support Audio quality is also very dependent on the microphones and speakers used at both ends of the call, as well as the available bandwidth. The IT team is working on prioritising audio traffic across our network. We have no control over the network outside the RCS (e.g. in people’s homes), however, which is also the case for Zoom.
Help! I’m used to using Zoom but I don’t know how to use Teams in a similar way.
Olga Donald in the digital development team will be providing training sessions on how to use the video conferencing features of Teams, including setting up webinars . Keep an eye on the IT and Digital newsletter for dates of sessions, and other training materials. Here is a brief getting started guide.
For specific training requests, please log a ticket in Unidesk.
What will happen to any videos I have stored on Zoom?
These will need to be transferred to OneDrive if you still want to have access to them.
- Access your cloud recordings by signing in to the Zoom web portal.
- In the navigation menu, click Account Management then Recording Management.
- You will see a list of cloud recordings on your account.
- Find the cloud recording you want to download.
- On the recording’s page, click the more option.
- Additional options will appear.
- Click Download.
How will this affect students?
Students can use Teams in a similar way to staff. In most cases the only change will be using links to a Teams meeting, instead of a Zoom meeting.
How many people will this affect at the RCS?
We estimate that there are around 300 regular users of Zoom, out of 3,000 licences that we have.
I have a series of Zoom meetings set up – how do I change them to Teams?
You will need to set up new meetings in Teams and send new links/calendar appointments as appropriate. Zoom will continue to be supported until June 2024, so meetings set up until that point will still work.
Where in the world does Teams not work?
All Microsoft Online Services are unavailable in Cuba, Iran, Democratic People’s Republic of Korea, Sudan, and Syria.
Why now, after we’ve been using Zoom since 2020?
There is an urgent need to reduce spending at the RCS. We also have a new digital strategy, which looks at ways in which we can use technology in a more strategic and streamlined way – this is the start of a project to look at duplication of function of software across the RCS.
Where do I go for help?
Please log a ticket on Unidesk and someone from IT will get back to you.
The following information is valid until June 2024.
What is Zoom? ![]()
Zoom is a cloud-based video conferencing service that you can use to virtually meet with others – either by video call or audio-only or a combination, you can also include live chat – and it lets you record your sessions to view later.
How to get started
Testing your computer setup
You can test your computer setup for Zoom, on their website: https://zoom.us/test
This will enable you to join a test meeting and check your internet connection, audio and video.
To Sign-in to Zoom
From your web browser, navigate to:
Click on Sign in
To sign in, enter your RCS username in the format username@rcs.ac.uk and then your password. If you are in the building or on the VPN using an RCS device you will be automatically logged in.
If you have the Zoom client or the Outlook add in, you will use Sign in with SSO to login and you will be prompted for either your RCS username and password or the domain which should be entered as rcs-ac-uk then click Continue, then in the browser window that opens select Open Zoom Meetings.
Joining a Meeting as a Participant
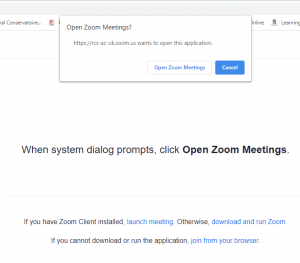
When an attendee clicks the Zoom meeting URL, they are presented with a popup box with the option of opening using the Zoom application on their device via the ‘Open Zoom Meetings‘ button.
If they have already downloaded the Zoom Client app on their device, they could also click the link ‘launch meeting‘, They are also offered the option to ‘download and run Zoom‘ , if they haven’t already done this, or to continue by via the internet using ‘join from your browser‘.
They are then taken to a video preview and the option to join with or without video. Attendees can unmute their microphones and adjust video settings using the relevant icons on the screen.
Creating a new meeting
From the Meetings area of the menu on the left, click on the Schedule a New Meeting button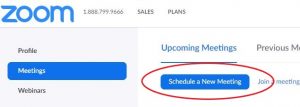
Select your meeting settings:
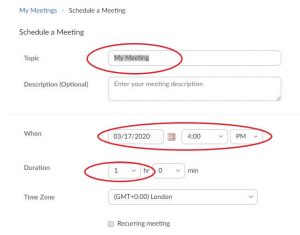 1. Topic (Meeting name, Module Code, Class Type etc.)
2. Description (Optional)
3. When (Date and Time)
4. Duration (note: this is not a hard limit when the meeting will end, but will give invitees an idea of the meeting duration)
5. Time Zone
6. Recurring meeting – tick box
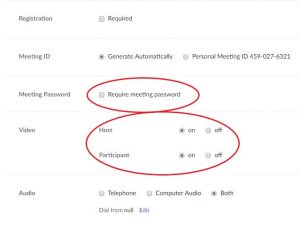
7. Meeting Passcode required (not optional, this is locked by the admin)
8. Video (this is your webcam – it can be disabled or enabled)
9. Audio (select Both)
10. Meeting Options (select Mute upon entry)
Click Save to finish.
Inviting people to attend a Zoom meeting in Outlook
In your Outlook Calendar
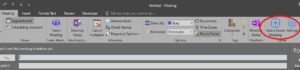
Select a Zoom meeting by clicking on Add a Zoom Meeting
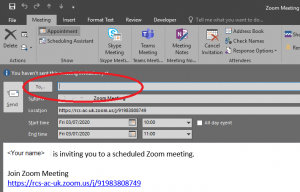
Add in the participants by typing their names in the To: area
Then click on the Send button
Hosting an unscheduled meeting

Click on Host a Meeting and then select either With Video On or With Video Off as appropriate .
If a dialogue box asking appears, click on Open Zoom.
Click on Join with Computer Audio.
(Note: it is always a good idea to test your speaker and microphone at this stage).
Click on Invite Participants and then Invite.
Click on copy URL. You can then send this via email to your invitees.
(Note: you can also click on Copy Invitation – this pastes the details to the clipboard so it can then be copied into an email)
Ending a Meeting
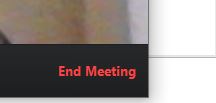
On the menu bar, click on End Meeting
Then click on End Meeting for All
(Note: If you want to hand the meeting over to someone else before you leave, you need to assign them as a Host first by right clicking on them, then you can choose the Leave Meeting option).
Further Help
If you are setting up Zoom meetings or classes on behalf of someone else, please go here for a page explaining the options, and advice on which option to use and when.
If you are the host of a meeting and want to use Breakout Rooms please check out the information here.
If you are the host of of a meeting and want to use live transcription (transcript and subtitles), please check out this page Zoom Live Transcript.
For more in depth information and instruction checkout Zoom’s video training a link to Zoom’s support articles.
Important note: If your Zoom meeting or class involves singing or playing a musical instrument, you may want to consider changing some audio settings to get a better experience. Please click here to be taken to a page with audio set up advice.